Facebook is changing.
“Thanks, Andrea… that’s not a newsflash!”
I’m specifically talking about the way that Facebook is changing in regards to safety, privacy, and security. Facebook is making improvements – and those improvements mean changes to the ways you manage your school’s Facebook page.
Enter… Facebook Business Manager.
After struggling with the proper set-up, myself, for the nearly 100 schools that #SocialSchool4EDU serves through social media management across the United States, I realized it was vital that I broke down what you needed to know for your school’s Facebook page.
Before we even start, I have to make one thing clear: I’ve been preaching it for a long time, but the very first thing you need to do is make sure that you are NOT running your Facebook page through a fake personal profile. This blog breaks down what this means, why you shouldn’t do it, and how you can fix it.
Now that I’ve made that point, let’s get to it!
It’s going to look like a “choose your own adventure” book – but stick with me, and I promise I’ll get you on the right path to a happy ending!
What is Facebook Business Manager?
Facebook Business Manager is a one-stop-shop to manage business tools, business assets, and employee access to these assets. It allows business pages to:
- Manage marketing and advertising activities
- Control users’ access
- Verify your account
- Experience more security (co-workers won’t see each other’s personal information)
- Control multiple pages in one Business Manager account
Within the Business Manager, you will add Facebook Business pages, such as your school’s Facebook page. Once you add your page, you will be able to control administrative and employee access through Business Manager, verify your business for increased security, and much more.
Why Do You Need to Set Up Facebook Business Manager Properly?
You might be thinking, “I don’t run ads and I only manage one page – so I am just going to pass on this new feature.”
That’s a mistake.
First of all, you may already have a Business Manager account – even though you didn’t set one up! Don’t worry; I’ll show you how to check for this in a minute.
Second, Facebook is currently auditing all business pages. This is going to take some time, but I’ve already seen some schools lose access to certain features within Facebook because they didn’t have their accounts set up properly. (For example, some schools are no longer able to connect their Facebook and Instagram accounts. Is that you?)
The path to properly set-up your Business Manager account is a curvy one. Every situation is a little different. My goal is to help provide some direction on what you should do next.
If you need further help, you may consider joining my membership program. Inside of that group, I am providing detailed video training on Business Manager, plus one-on-one private help sessions with schools across the country.
Step 1 – Check “Page Roles” to see if there is already a Business Manager account
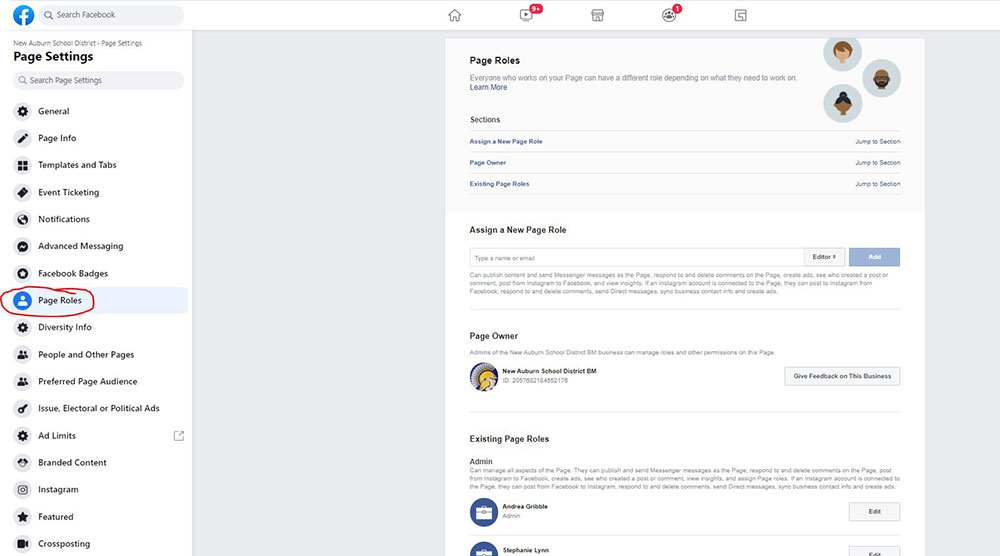
To see if there is a Business Manager already set up for your school Facebook page, first visit “Settings” from a computer. Click “Page Roles.”
If you spot a “Page Owner,” then your Facebook page already has a Business Manager account that has claimed your page. You can move to Step 2A.
Don’t see anything listed for “Page Owner” – or rather, that category under Page Roles doesn’t even exist? Then move to Step 2B.
Step 2A – Visit business.facebook.com to see if you have access to any business manager accounts
I’m crossing my fingers that you have access to the Business Manager account that owns your school’s Facebook page!
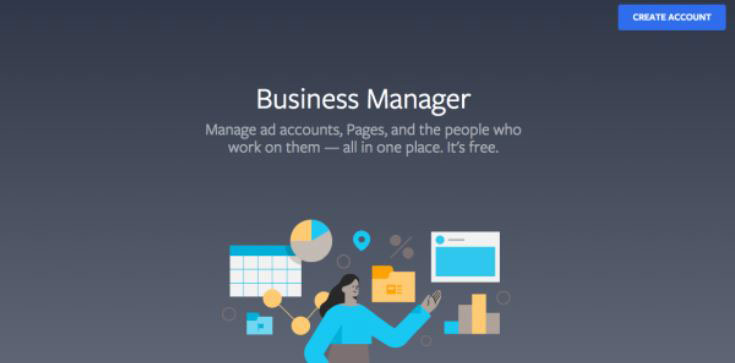
Log into your personal profile on Facebook on one tab of your computer. This would be the same Facebook profile that you use to manage your school’s Facebook page. Now, in another browser tab, visit “business.facebook.com.”
If your screen looks like the image above, which gives you the option to “Create Account” – then you do NOT have access to the Business Manager account. You need to move to Step 3B.
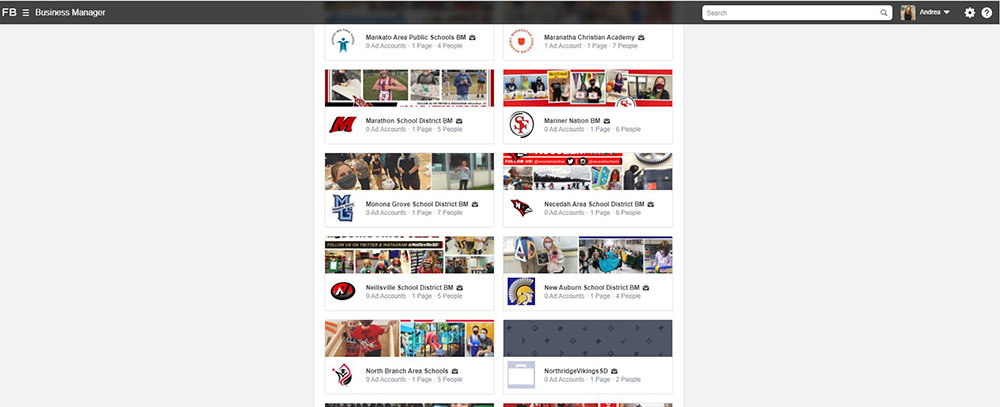
If you DO spot the “Page Owner” description (matches what showed up under “Page Roles” in Step 1) – then you are in luck. You have the correct access to the Business Manager account that owns your Facebook page.
You can see in the image above that I have access to a lot of Business Manager accounts. Notice my profile picture in the upper right-hand corner. I know that I am logged into my personal Facebook account, based on that image.
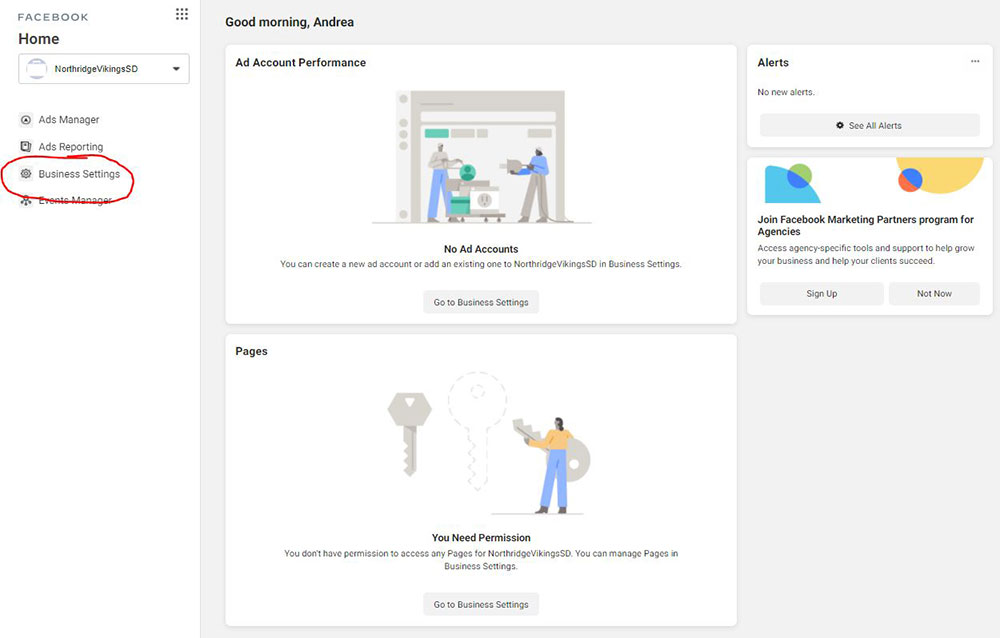
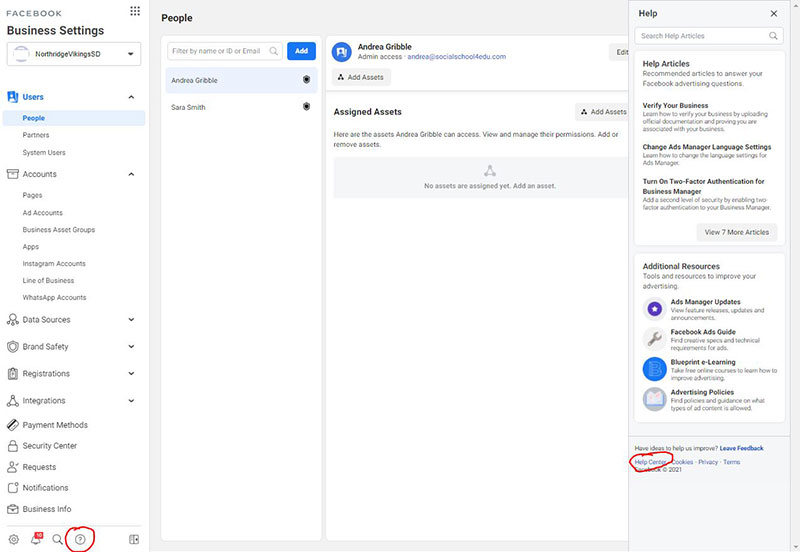
When you spot your school’s Business Manager account, you may see your cover image – but most likely, you just see a gray image with a briefcase as the profile photo, similar to the Northridge Vikings SD page. That’s OK. You will be able to set that up properly, later.
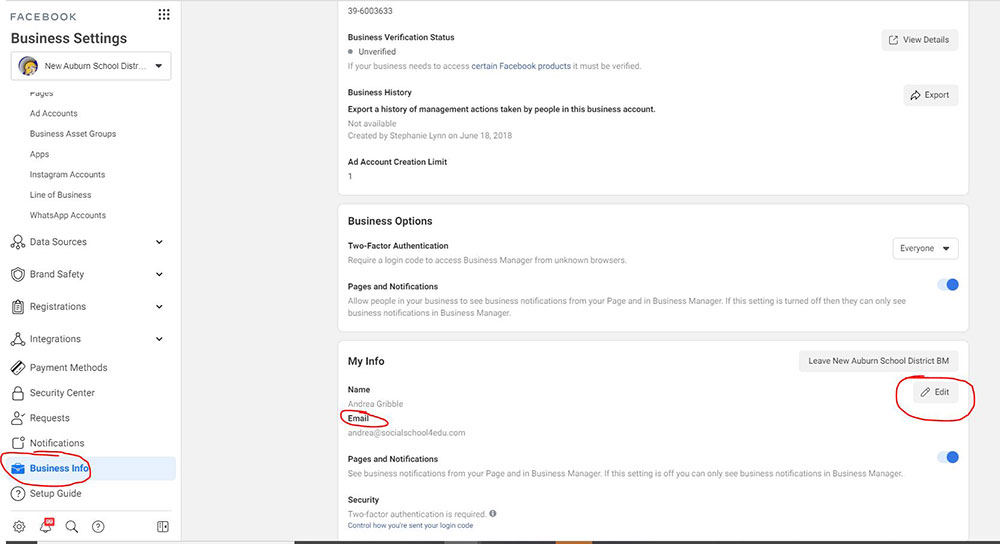
Now, click “Business Settings”, scroll down the left side, and click “Business Info.” At the top of Business Information, you see the name of the page along with a Business Manager ID. Verify that the name and the ID number match what is listed on the backside of your Facebook page where you identified the “Page Owner” in Step 1. If it does, you can move to Step 3A. If it doesn’t match, then you will have to move to Step 3B.
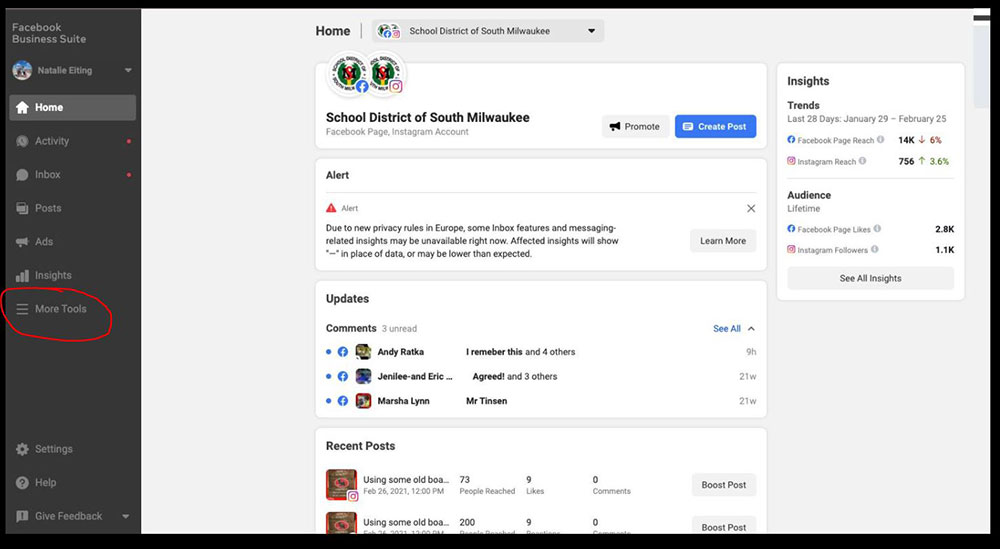
Special note – If you don’t see any of this, but are rather taken to the Business Suite view when you type in “business.facebook.com”, go to “More Tools” and select “Business Settings.”
This should allow you to get into the areas that I discussed above.
Step 2B – Set up a Business Manager account
Type in “Business.Facebook.com”
Facebook makes this process pretty easy. Just make 100% sure that you use the email associated with your personal Facebook account – the one that you use to manage your school’s Facebook page. It will ask for your Business Email. This email address needs to be the same email you use for your personal profile. You also need access to log into that email inbox to confirm your account.
If you’re still using an old email account that you no longer have access to, then you need to update your email address FIRST, under “Settings” on your personal Facebook profile, before setting up this Business Manager account.
Once you have the Business Manager account set up, proceed to step 3A.
Step 3A – If you have access to Business Manager, verify your email address first
Before you take one more look inside of Business Manager, you need to verify that your email address is properly loaded. To check, visit “People” and then look at your name across the top. If your email is listed – you’re good. If not – you need to add it!
If you need to add it, visit “Business Info” and then scroll to the bottom where you can hit the “Edit” button to add your email. You need to enter twice and then check your email inbox. Facebook will send you a verification email that you need to open, and then click to confirm it is correct. Once you do, you will see your email address show up at the top of the page under “People” when your name is selected.
If other people are listed in the people section of the Business Manager account, you need to make sure that they also have their emails listed. If they don’t, you will have them follow the same steps you just did to add their email addresses. You cannot do this for them.
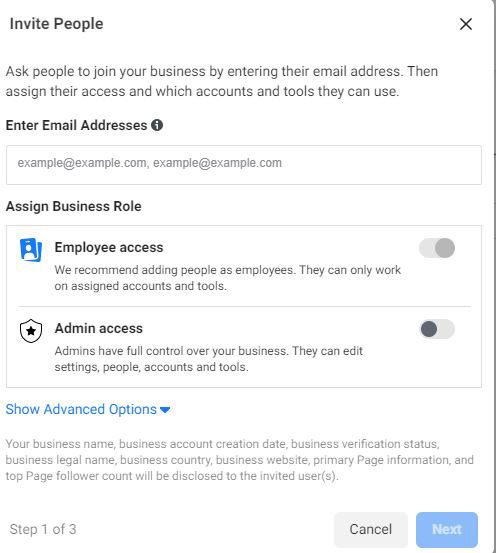
You should have at least two people set up as administrators of your Business Manager account. You can also add other Facebook page admins and editors through this account. It makes it easy because you only need their Facebook email addresses to add them!
To add more, visit the “People” tab and click the blue “Add” button. Type in their email addresses and select employee access or admin access.
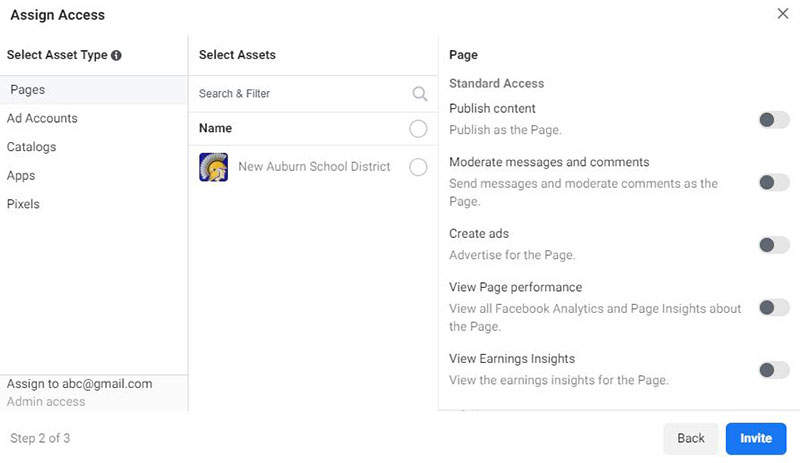
Next, you will assign access. Select the correct page and on the right, you can toggle to allow them access to different activities. If they are a full admin, scroll to the bottom on the right to select Admin Access – Manage Page.
Give your added team members a heads-up to check their email so that they can accept the Facebook invitation to be added to your Business Manager account. One would think Facebook would automatically input their email address for them, but you need to have them check it!
Now you’re ready to skip to Step 4.
Step 3B – If you don’t have access to Business Manager, you need to find out who does (or ask Facebook to release the page)
This is the toughest spot to be in. I’m sorry if you are at Step 3B right now. It means your page is locked inside of a Business Manager account that you don’t have access to!
Good news: There are two options, and I’ve had success with both.
First, reach out to anyone in your district who might have had administrative rights to your school’s Facebook page. I would start by looking at those who have had access since 2017, because that is when it appears Facebook started automatically creating these Business Manager accounts.
These administrators may or may not still work in your district. Do your best to reach out to them and walk them through Step 2A. The easiest way to do this is over a videoconference so that you can see their computer screen, such as Zoom or Google Meet. This should take less than 10 minutes to check.
If that person DOES have access to the correct Business Manager account, it is CRITICAL that they complete Step 3A before adding you as an administrator. If they don’t verify their email first, they could get locked out of the Business Manager account and be unable to add you to the account.
Once you are added to the account, you should add one other administrator before removing the initial person that did have access to the page. You may have a 7-day delay before you can remove anyone from the page, but that is just a safety precaution from Facebook.
If you have tried reaching out to everyone you can think of, and no one has access to the Business Manager account, then it’s time to contact Facebook.
First, you will need to set up a new Business Manager account by following Step 2B.
Next, you will visit the Business Manager Help Center.
You may or may not have the ability to send a message to Facebook. My access allows me to get to a screen like this where I can hit “Get Started.”
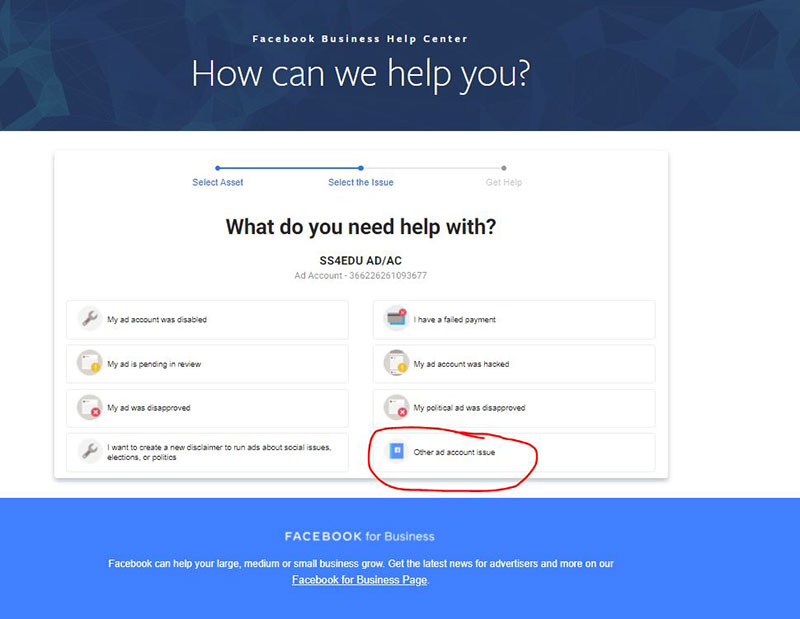
Then, I select an asset (the Business Manager account you just set up), and hit “Other ad account issue.”
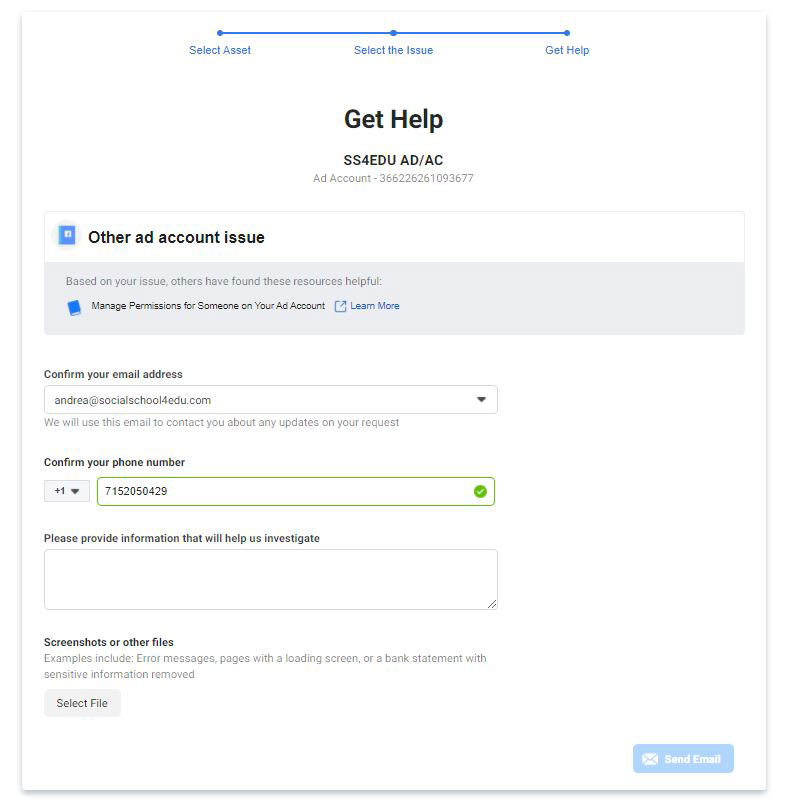
I realize that you don’t have an ad issue, but you need to select this to get to this screen where you can email them the problem.
Once you are here, the wording you use to describe the problem is very important. Here is an example that worked for one of our school accounts:
I am requesting the removal of https://www.facebook.com/oostburgschools that I am admin on from this page owner/business manager Oostburg Schools (BM ID: 182152125904561).
I don’t have access to the email account for the person who originally set up this page owner/business manager account. We believe it was a former employee who no longer works inside of the district.
Someone from Facebook will respond quickly to say that they are working on the issue, and within 1-2 days, they will provide detailed information that is needed to free the page. This will include a copy of your driver’s license, a W9 or other legal document to the school, and a whole list of details around your account that you will need to list and then sign to verify that the information is true and accurate.
Now you understand why I’m sad that you are at this step! It’s a lot of work, it’s confusing, and frankly, it causes a LOT of frustration. But I’m here to say that I’ve had success with dozens of pages by following these steps, so I know that you can, too!
Once you gain access to the Business Manager account or start a new account (once your page is released from the account that you do not have access to), then you should go back to Step 3A.
Step 4 – Complete the Business Information section
Now it’s time to complete the Business Information section. This includes assigning your primary page, which will replace the white and gray briefcase with your profile picture from your business page. You can also add your business details, verify your business, and turn on two-factor authentication.
Please note that when you turn on two-factor authentication, everyone who has access to your page through Business Manager will be required to have this turned on with their personal Facebook profiles. If they don’t, they will lose posting access to the page.
I’m not walking through this step with screenshots, since it’s pretty straightforward. Just note that if Facebook asks for a legal document proving your school as a business, you can use the school W9 form.
Next Steps
We’ve survived the basics of Facebook Business Manager! There are many additional steps that you should take to connect to Instagram, verify your website domain, and more. But these basics will ensure that you have control over your page in the right way, so you shouldn’t lose access to it when Facebook audits your page!
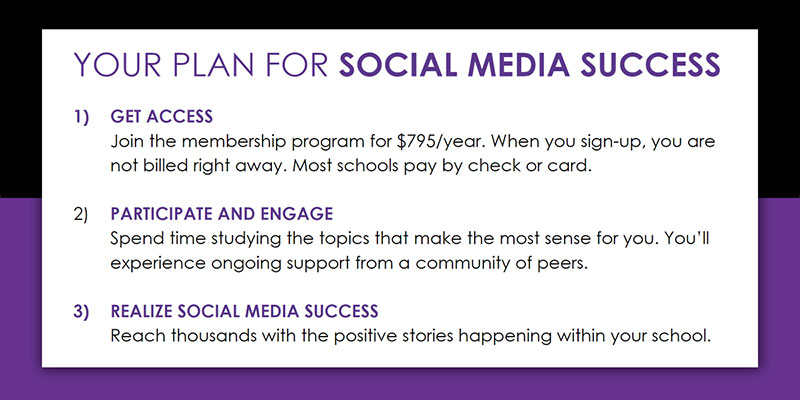
Need more help? I have extensive resources and personalized support available in my membership group. You’re invited to join! There is a membership fee, but I can promise you that the support you will get for your school will be well worth the investment.
Properly managing social media for your district is a complex job. Posting awesome photos on your pages is just one piece of the puzzle. Dealing with the ever-changing platforms like Facebook, Instagram, and Twitter is challenging. Our membership program is full of K12 social media managers just like you – the perfect community for you as you serve your school!


